


just 受 make 这个老牌编排工具启发,专注于命令集的管理,适合用于记录和运行开发阶段的命令,上手容易,开发活跃,推荐做开发的朋友使用。
GitHub: casey/just: 🤖 Just a command runner (github.com)
官方提供了详细又容易理解的语法文档,可以到 GitHub 首页查看。因此本文不会讲语法,主要是传递“命令即代码”的理念和分享我的真实用例。
安装
官方文档: https://github.com/casey/just#installation
下面是 Linux 上的通用安装命令(安装位置 /usr/local/bin 可以根据需要改)
curl --proto '=https' --tlsv1.2 -sSf https://just.systems/install.sh | sudo bash -s -- --to /usr/local/bin
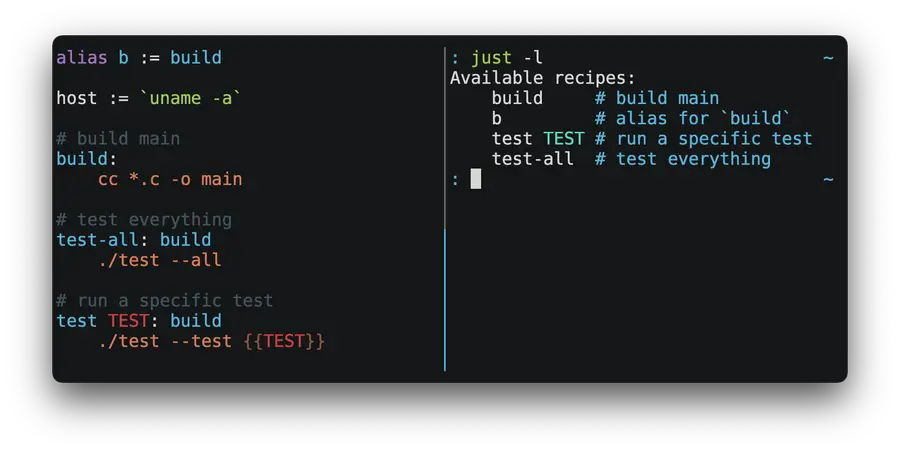
just --help
定义命令(在 justfile 里也叫 recipe ,配方),就是创建一个名为 justfile 的文件,这个文件可以放到任意目录下,在执行 just 时,会从当前目录向下找到最近的一个。
用法直接看文档,中文文档更新不及时,第一次可以花 45min 看一遍中文文档,后面最好还是以英文为主。
解决的开发痛点
以 Python Django 项目开发为例。
使用 just 前:
- 每次启动开发服务器,都需要复制一遍
uv run manage.py runserver 0.0.0.0:7456粘贴到终端运行。 - 每次运行测试,都需要执行
PROJECT_CONFIG_FILE=Navigation/fixtures/test_config.yaml uv run manage.py test Navigation,这里除了测试命令,还需要通过环境变量指定测试环境
使用 just 后。
- 启动开发服务器只需要输入
just run后回车。实际使用上利用补全,整个过程可以非常快速自然: [输入 ju ] - [ tab ] - [点一下 r ] - [ tab ] - [回车] ,一秒左右。 - 运行测试,输入
just test Navigation即可。
just 封装了命令的细节,使执行某个操作更像是按一个按钮,而不是手动排线后上电,再者长度更短,这就减少了 token 输入,给大脑留出更多上下文。封装本身,又能把开发和调试命令两个阶段分开,开发看的是整个项目、调试命令就只关注 justfile 文件,分区更明确。
像是启动命令这类开发中常用的命令文本,在使用 just 之前我会放到项目根目录下一个名为 dev_cheatsheet.md 的文件里,这个文件会放置各种开发中会用到但是和生产环境无关的资料,比如常用的命令、临时笔记、大模型的提示词等。
复制命令再粘贴执行听起来很快,但实际使用却并不好。一是需要点开这个文件,然后找到那行复制,这两个操作都挺累的;二是这个过程不自然,心想着要启动,那自然下一步就是打开终端,结果在输入命令时卡住,因为启动命令即便记熟了,输入起来也很慢,所以只能先找到命令再复制,有点被打断的感觉。
除了用起来不方便,还有一个致命问题,就是这个文件不适合使用 git 跟踪。因为这个文件的定位可以看作是装修用的工具箱或者是数学演算用的草稿纸,属于临时用品。但是这些命令又是开发时实打实需要的,如果丢失,对于那些有特殊参数的就得仔细回忆了。所以这些命令需要跟踪,即“命令即代码”,但是承载它的文件又不能被跟踪,如果放到开发文档又感觉不合适,之前选择放任不管,毕竟开发环境很少改变。
使用 just 就能解决上面的两个痛点。
- 要执行某个操作,打开终端,然后输入
just <commond>运行即可,非常自然。这里的 commond 还都是自己写的有意义的单词,如 run 、test 、ai 、build 等,根本不需要特意去记。 - justfile 承载了开发时会用到的命令集,对于新加入的开发成员,可以从这个文件开始了解项目:怎么启动、怎么测试,有什么特殊的参数。
真实用例
单一个 just 不带命令名,会运行 justfile 里第一个命令,我一般会把这个留给启动命令 run ,如果是一个包,我会留给测试命令 test 。
命令补全 - 必做
https://github.com/casey/just#shell-completion-scripts
vim ~/.bashrc
修改 justfile 文件路径
eval "$(just --justfile ~/path/to/justfile --completions bash)"
source ~/.bashrc
git 命令
我习惯这样使用 git 。
在写代码之前,先创建一个空的提交,填上这次的需求类型和简单描述。git 可以指定一个 .gitmessage 文件,在新建 commit 时,会携带上 .gitmessage 里的内容,作为模板进行编辑。
# (必填)提交类型: feat|fix|docs|style|refactor|perf|test|build|dev|config|chore|revert 和简述,模块可选
# <type>[optional scope]: <description>
:
当写完一部分代码后,使用 amend 把当前的变更添加到 commit 里,然后再写新的代码,再继续 amend 。
将这两个做成 recipe 放到 justfile 里,就是 just new 和 just amend。
root := justfile_directory()

# 创建一个空 commit ,带提交信息模板
@new:
  cd {{root}} && git commit --allow-empty --edit --file={{root}}/.gitmessage

# 将所有文件 amend ,若取消则将暂存区文件移出
@amend:
  cd "{{root}}" && git add . && git commit --amend || (git restore --staged . && false)

@forget:
  if git diff --quiet HEAD HEAD~1; then \
    git reset --soft HEAD~1 && echo "✅ 空提交已删除"; \
  fi

# 统计代码量
cloc range="":
  cd "{{root}}" && git ls-files -z \
    | grep -z -v -E '\.(g|freezed)\.dart$' \
    {{ if range != "all" { "| grep -z -v '^test/'" } else { "" } }} \
    | xargs -0 cloc
如果使用 just new 后悔了,可以用 just forget 取消这次空提交。
使用 cloc 统计被 git 跟踪的文件的代码量,排除了以 .g.dart 和 .freezed.dart 结尾的文件(这是自动生成的文件)。另外会默认排除 test/ 目录下的文件,如果使用 just cloc all 则会不排除 test/ 目录。这样就不需要到处找统计代码量的命令了。
Django 项目命令
我使用 monorepo ,即在一个仓库存放多个包和项目,因此仓库根目录 root 是在当前项目的上上级目录,虚拟环境也在那。可以在 justfile 里先把所有路径设置好。
root := justfile_directory() / "../.."
python_environment := root / ".venv"
python_interpreter := python_environment / "bin/python"
uvicorn := python_environment / "bin/uvicorn"

@run:
  just echo_url
  cd "{{justfile_directory()}}" && {{python_interpreter}} manage.py runserver 0.0.0.0:8535

@watch_and_run:
  just echo_url
  cd "{{justfile_directory()}}" && {{python_interpreter}} manage.py tailwind runserver 0.0.0.0:8535

build_tailwind:
  cd "{{justfile_directory()}}" && {{python_interpreter}} manage.py tailwind build --force

@echo_url:
  echo "网址: http://localhost:8535/"
  echo "后台网址: http://localhost:8535/admin/"

@shell:
  cd "{{justfile_directory()}}" && {{python_interpreter}} manage.py shell_plus

@make_i18n proj:
  cd "{{proj}}" && {{python_interpreter}} django-admin makemessages -l zh_Hans

@comp_i18n proj:
  cd "{{proj}}" && {{python_interpreter}} django-admin compilemessages

@make_migrations proj:
  cd "{{justfile_directory()}}" && {{python_interpreter}} manage.py makemigrations {{proj}}

@migrate:
  cd "{{justfile_directory()}}" && {{python_interpreter}} manage.py migrate

@test app="Navigation":
  ALLABOUTME_CONFIG_FILE={{app}}/fixtures/test_config.yaml uv run manage.py test {{app}}
熟悉 Django 的,上面的命令应该都能看明白,就不再多说,
有一点值得提一下。just run 里先执行了 just echo_url,echo_url 就是显示项目常用的网址,我感觉这个很实用,启动后点击网址就能直接打开浏览器查看,很方便。放在之前,我总是到浏览器手动输入网址。
flutter 项目命令
flutter 上,管理命令更为必要,因为 dart 支持编译期的代码裁剪,只要 if 后面跟的是常量 false 就能把整块代码删除,这对于控制开发版本和发布版本非常有用。在编译不同版本时,通过传参改变常量的值,使用 just 把这一长串命令封装为几个简单的单词。
简单介绍下面值得说的:
- app_version 和 app_build ,从 pubspec.yaml 里拿到版本号,在编译时作为常量传入,这样就能在 app 里显示版本号,并且是常量而非动态获取。
- start_api 和 stop_api ,在测试时,需要启动服务端,这里通过 just 的语法,确保在执行
just test时,先执行 start_api ,在正常退出后,再执行 stop_api ,完全自动化。 - app_release_path ,在本地编译完文件后,由于编译产物在很深的目录里,手动打开就很心烦,所以在
just build中在编译好之后通过 Windows 的 explorer.exe 直接打开对应目录,非常巴适。 - HTTP_PROXY ,flutter 的很多命令,会强制在开始时检查包版本,而中国的网络会让这个检查超级慢,乃至失败,所以在这些命令前使用环境变量设置代理地址,再也不用操心了。
root := justfile_directory()
build_dir := join(root, "build/app/outputs/flutter-apk")
app_release_path := join(build_dir, "app-release.apk")
app_version := `grep '^version:' pubspec.yaml | cut -d ' ' -f2 | cut -d '+' -f1`
app_build := `grep '^version:' pubspec.yaml | cut -d ' ' -f2 | cut -d '+' -f2`

HTTP_PROXY := "http://192.168.2.205:10808"

set positional-arguments

# === 项目配方 ===

@run:
  flutter run --dart-define-from-file=lib/app/constants/env.json --dart-define=APP_VERSION={{app_version}} --dart-define=APP_BUILD_NUMBER={{app_build}} --dart-define=APP_IS_IN_DEV=true

# just test test/model/plan/trigger_model_test.dart
@test *args: start_api && stop_api
  HTTP_PROXY="" HTTPS_PROXY="" \
  flutter test --dart-define-from-file=test/config_and_data/env.json "$@" || true

@build:
  HTTP_PROXY="{{HTTP_PROXY}}" HTTPS_PROXY="{{HTTP_PROXY}}" just inner_release_build "true"
  if [ -f "{{app_release_path}}" ]; then \
      /mnt/c/Windows/explorer.exe "$(wslpath -w {{build_dir}})" || true; \
  else \
      echo "APK not found!" >&2; exit 1; \
  fi

@inner_release_build in_dev="false":
  flutter build apk \
    --target-platform android-arm64 \
    --release \
    --obfuscate \
    --split-debug-info=build/debug-info \
    --dart-define=APP_VERSION={{app_version}} \
    --dart-define=APP_BUILD_NUMBER={{app_build}} \
    --dart-define=APP_IS_IN_DEV={{in_dev}} \
    --dart-define-from-file=lib/app/constants/env.json

@get:
  HTTP_PROXY="{{HTTP_PROXY}}" HTTPS_PROXY="{{HTTP_PROXY}}" flutter pub get

@add package dev="":
  HTTP_PROXY="{{HTTP_PROXY}}" HTTPS_PROXY="{{HTTP_PROXY}}" flutter pub add {{package}} {{dev}}

@build_runner:
  dart run build_runner build --delete-conflicting-outputs

@l10n:
  flutter gen-l10n

@format:
  find lib test packages -name "*.dart" \
    ! -name "*.g.dart" \
    ! -name "*.freezed.dart" \
    -print0 | xargs -0 dart format
  dart run import_sorter:main

@analyze path="lib test":
  flutter analyze {{path}}

# 启动 api 并后台运行
@start_api:
  cd ~/pythonServe/plantodo_sync/services/sync && just > api.log 2>&1 &

# 停止 api
@stop_api:
  kill $(ss -tunlp | grep ':25842 ' | awk -F'[=,]' '{print $3}')
AI
我目前使用 Claude Code 加国内的 coding plan ,通过环境变量控制 Claude Code 使用自定义的端点网址和模型。
@ai model="glm-5" args="":
  HTTP_PROXY="{{HTTP_PROXY}}" HTTPS_PROXY="{{HTTP_PROXY}}" \
  ANTHROPIC_BASE_URL="https://coding.dashscope.aliyuncs.com/apps/anthropic" \
  ANTHROPIC_AUTH_TOKEN="sk-sp-123456789987654321xxcbxxxxx" \
  API_TIMEOUT_MS=3000000 \
  CLAUDE_CODE_DISABLE_NONESSENTIAL_TRAFFIC=1 \
  ANTHROPIC_MODEL="{{model}}" \
  ANTHROPIC_SMALL_FAST_MODEL="{{model}}" \
  ANTHROPIC_DEFAULT_SONNET_MODEL="{{model}}" \
  ANTHROPIC_DEFAULT_OPUS_MODEL="{{model}}" \
  ANTHROPIC_DEFAULT_HAIKU_MODEL="{{model}}" \
  CLAUDE_CONFIG_DIR="$HOME/claude-model/.project_claude" \
  claude {{args}}

@aicontinue:
  just ai "glm-5" --continue
有时候退出后希望返回上次的对话里,就使用 just aicontinue
另外,我会在 CLAUDE.md 或 AGENT.md 中,明确说明使用定义的 just 命令。
这样既能约束其行为避免意外操作,又能在 just 里设置好所有内容,确保运行成功。以 test 为例,使用 just 确保测试前启动、测试后关闭,AI 完全不需要关心后端的存在。
原文链接: https://yanh.tech/2026/04/just-manage-terminal-commands-making-commands-as-code/
版权声明:本博客所有文章除特別声明外,均为 AhFei 原创,采用 CC BY-NC-SA 4.0 许可协议。转载请注明来源 技焉洲 (yanh.tech) 。